

How to Build a WordPress Website in 2026 (Free Beginner Guide)

Want to build your own WordPress website in 2026 but you are not sure where to start? You are in the right place. This guide walks a complete beginner through every step, from picking a domain name to installing must-have plugins, so you can launch a real, working WordPress site in a single afternoon.
WordPress still powers roughly 4 out of every 10 sites on the internet, including blogs, online stores, booking sites, portfolios, news outlets, and small business pages. It is free, open source, and you can extend it with thousands of themes and plugins without writing code.
By the end of this guide you will have:
- A live domain pointing to your hosting account.
- WordPress installed and updated to the latest version.
- A theme that looks the way you want.
- Your first pages, posts, and menu published.
- The plugins you actually need (and the ones you do not).
- A short launch checklist for security, speed, and SEO.
Quick note: this guide focuses on self-hosted WordPress (the WordPress.org software you install on your own hosting). It is not the same as WordPress.com, which is a hosted product with its own plans and limits. Self-hosted WordPress gives you full control over your design, plugins, monetization, and SEO.
What you need to start a WordPress website
To launch a WordPress site you only need three things:
- A domain name. This is your address on the web, for example
mywebsite.com. Domains cost about $10 to $15 per year. Many hosts include a free domain in the first year. - A web hosting plan. Hosting is where your site files actually live. Shared WordPress hosting for a beginner starts at around $3 to $5 per month on an introductory plan and renews higher, typically $9 to $15 per month.
- WordPress itself. The software is free. Almost every modern host installs it for you in one click.
Realistic first-year budget: about $60 to $150, depending on your hosting plan length, whether you add email, and whether you buy a premium theme. You can absolutely start cheaper using a free theme and the WordPress.org plugin directory.
The 8 steps we cover below are:
- Pick a domain name and a hosting plan.
- Set up your hosting account.
- Install WordPress.
- Choose a theme.
- Add your essential content (pages and posts).
- Customize your essential settings.
- Install your starter plugins.
- Run the pre-launch checklist (security, speed, SEO).
Let's go.
Step 1: Pick a domain name and a hosting plan
Your domain and your host are the foundation of your site, so spend a few minutes on this step.
How to choose a good domain name
A strong domain name in 2026 is short, easy to spell, easy to say out loud, and clearly tied to your brand or topic. A few simple rules:
- Keep it 2 to 3 words when possible.
- Stick to
.comif you can; use.co,.io,.org, or a country-code domain (.de,.es,.co.uk) as a backup. - Avoid hyphens and numbers, they hurt recall.
- Skip trademarks (do not use "Nike", "Apple", a brand-name-plus-keyword combo, etc.).
- Search the exact handle on Instagram, X/Twitter, TikTok, and YouTube before you commit, so your brand is consistent across the web.
If your first pick is taken, try adding a category word (getmywebsite.com, mywebsiteapp.com, mywebsitehq.com) rather than misspelling the main word.
How to choose hosting
Web hosting is where your WordPress files, database, images, and emails actually live. The host decides how fast your pages load, how reliably they stay online, and how much spam, malware, and traffic noise your site can survive.
For a beginner site, you have three reasonable categories:
- Shared WordPress hosting (Bluehost, Hostinger, SiteGround, DreamHost): cheapest tier, fine for new sites and small blogs.
- Cloud or managed WordPress hosting (Cloudways, Kinsta, WP Engine): faster, better support, costs more, scales better.
- Free hosting: useful for learning and testing, not for serious projects (ads, downtime, weak performance).
If you want to compare options before you decide, we maintain two side-by-side guides:
- 7 Best WordPress Hosting Plans for Your Website (Compared) covers Kinsta, Bluehost, Hostinger, SiteGround, Cloudways, Hosting.com, and DreamHost.
- Best Free Hosting Plans for Your WordPress Website for testing or learning only.
For the rest of this guide we will use Bluehost as the example because it is officially recommended by WordPress.org, the dashboard is friendly for beginners, and it includes a free domain and one-click WordPress install. The steps look almost identical on Hostinger, SiteGround, or DreamHost. If you would like the FS Code discount on Bluehost, you can use this link:
Step 2: Set up your hosting account
Go to the Bluehost site and click Get Started. You will see four shared hosting plans. For a brand new site, the Basic or Choice Plus plan is enough; Choice Plus adds unlimited sites and free domain privacy.
After picking a plan, Bluehost will ask you to set up your domain:
- If you want a new domain, type it in the left box and Bluehost will register it for free for the first year.
- If you already own a domain from another registrar (GoDaddy, Namecheap, Cloudflare Registrar, etc.), type it in the right box. After checkout you will update the nameservers at your current registrar to point to Bluehost; Bluehost has a short walkthrough for that step inside their help center.
Next, fill in your billing info, choose your term (a 12-month plan is the usual starting point), and uncheck any extras you do not need (some upsells like SiteLock Security are not required for a beginner site, you can add them later). Confirm your purchase, agree to Bluehost's terms, and finish checkout.
Once payment is confirmed, you will land on the Bluehost dashboard. Set your account password when prompted and log in.
Step 3: Install WordPress
Bluehost (and almost every beginner-friendly host) installs WordPress for you automatically. If you are starting from scratch in 2026, you will normally see a guided onboarding flow:
- Bluehost asks what kind of site you are building (blog, business, store, portfolio).
- It suggests a starting theme or template.
- It installs WordPress on your domain and creates an admin user.
When the install is done, your login URL will look like:
https://www.yourdomain.com/wp-adminLog in with the email and password you set during onboarding and you will see the WordPress dashboard for the first time.
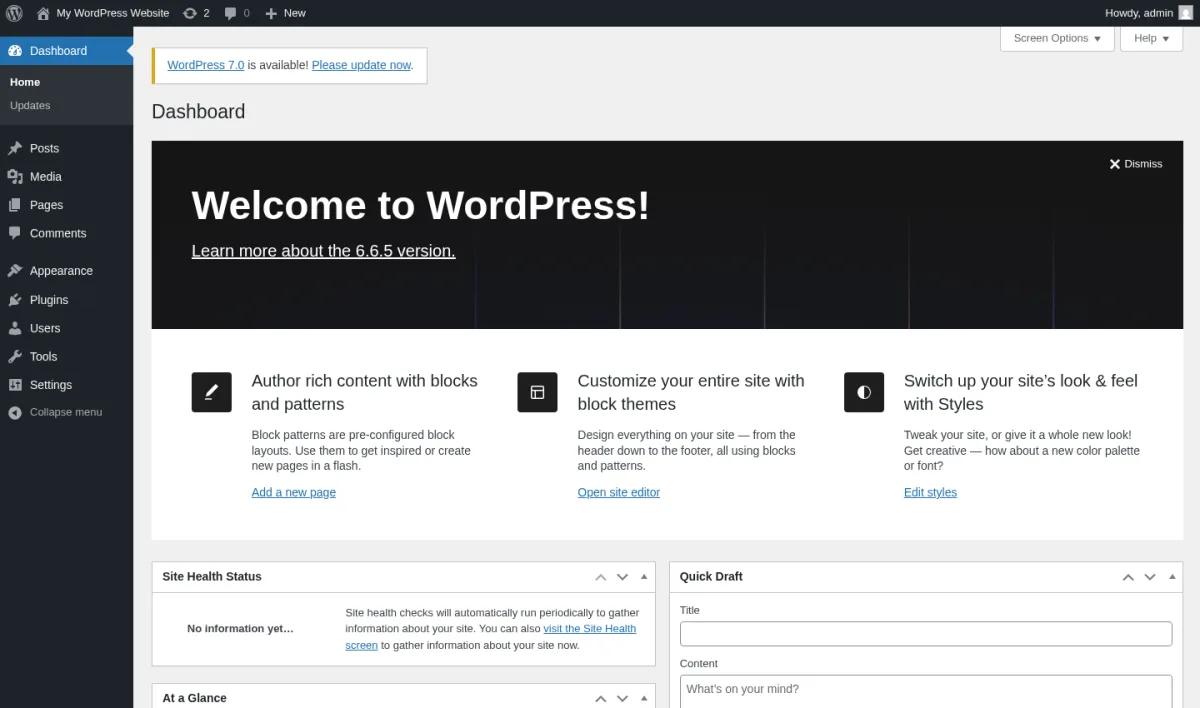
If you ever need to install WordPress manually, every major host also has a one-click installer (Softaculous, Installatron, MOJO) inside cPanel or their custom control panel. The flow is the same: choose the domain, choose the directory (leave blank for the root), set an admin user and password, click install.
New to the WP admin screen? Take 10 minutes to skim our beginner's guide to the WordPress admin dashboard so you know where each menu lives before you start customizing.
Step 4: Choose a theme
A WordPress theme controls how your site looks and how it is laid out. In 2026 there are two big families of themes:
- Block themes (Full Site Editing). These work with the WordPress Site Editor (Appearance, Editor) and let you change headers, footers, archive pages, and templates visually. Twenty Twenty-Five (the default) is a block theme. So are most modern themes from WordPress.org.
- Classic themes. These still use the older Customizer (Appearance, Customize). They are fine, especially if you pair them with a page builder like Elementor.
To install a free theme, go to Appearance, Themes, Add New Theme. You can filter by industry, layout, feature, and subject. Click Install, then Activate.
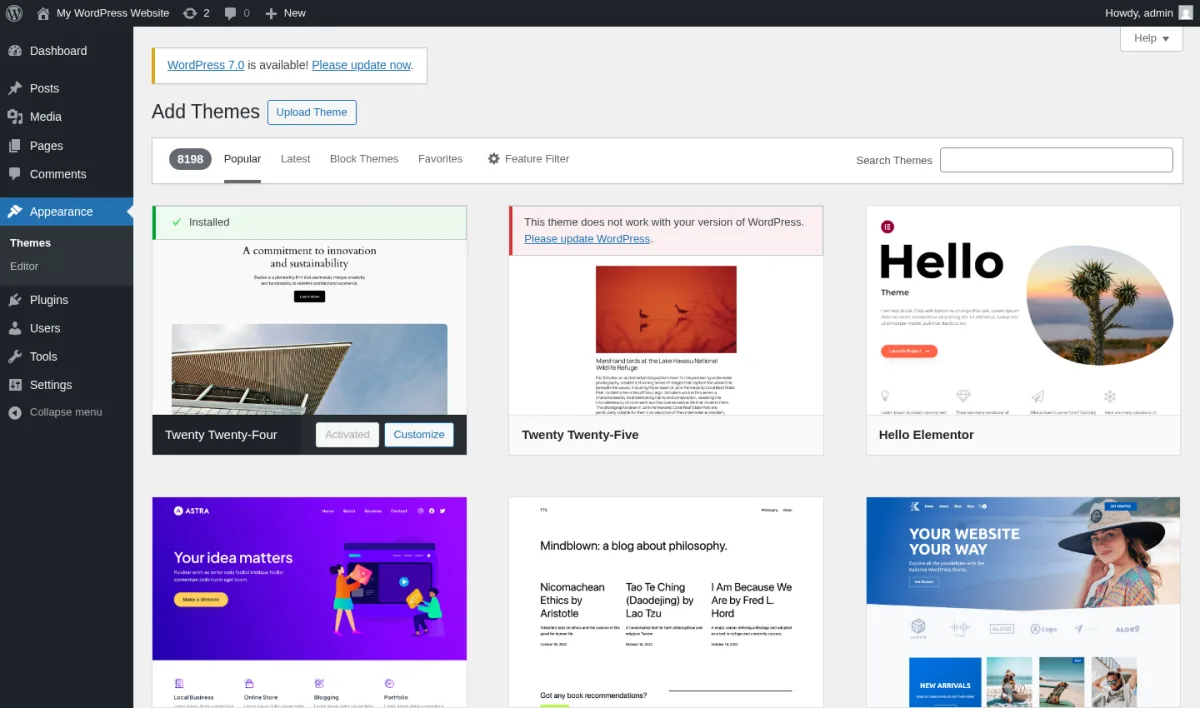
Solid free starting points in 2026:
- Twenty Twenty-Five: modern default block theme, very fast, full site editing.
- Astra: lightweight, paired with Starter Templates for quick site kits.
- Kadence: block-based, strong performance, great default typography.
- Hello Elementor: minimal theme designed to be styled entirely in Elementor.
- Neve: small page weight, AI-assisted starter sites.
If you want a curated list with screenshots, see 10 best free WordPress themes.
Want premium? Themeforest still has thousands of polished WordPress themes for one-time purchase. The biggest 2026 advantage is full Elementor or block-editor compatibility plus included demo content, so you can launch a near-finished design in a few hours: browse premium WordPress themes on Themeforest.
A quick warning: do not download premium themes from torrent or "nulled" sites. The code is almost always tampered with and is a common malware entry point.
Step 5: Add your essential content
Now that your theme is live, give your site something to show. WordPress organizes content into pages and posts.
- Pages are static. They rarely change. Use pages for Home, About, Contact, Services, Pricing, Privacy Policy, and Terms.
- Posts are time-based. Use them for blog articles, news, case studies, product updates. Posts can be grouped by Categories (broad buckets like "Marketing", "WordPress", "Booking") and labeled with Tags (specific topics like "GA4", "Elementor", "Booknetic").
To create your first page:
- Go to Pages, Add New.
- Type a title (for example, "About").
- Use the block editor to add a heading, a paragraph, an image, a button, a columns block, or any block pattern.
- Click Publish.
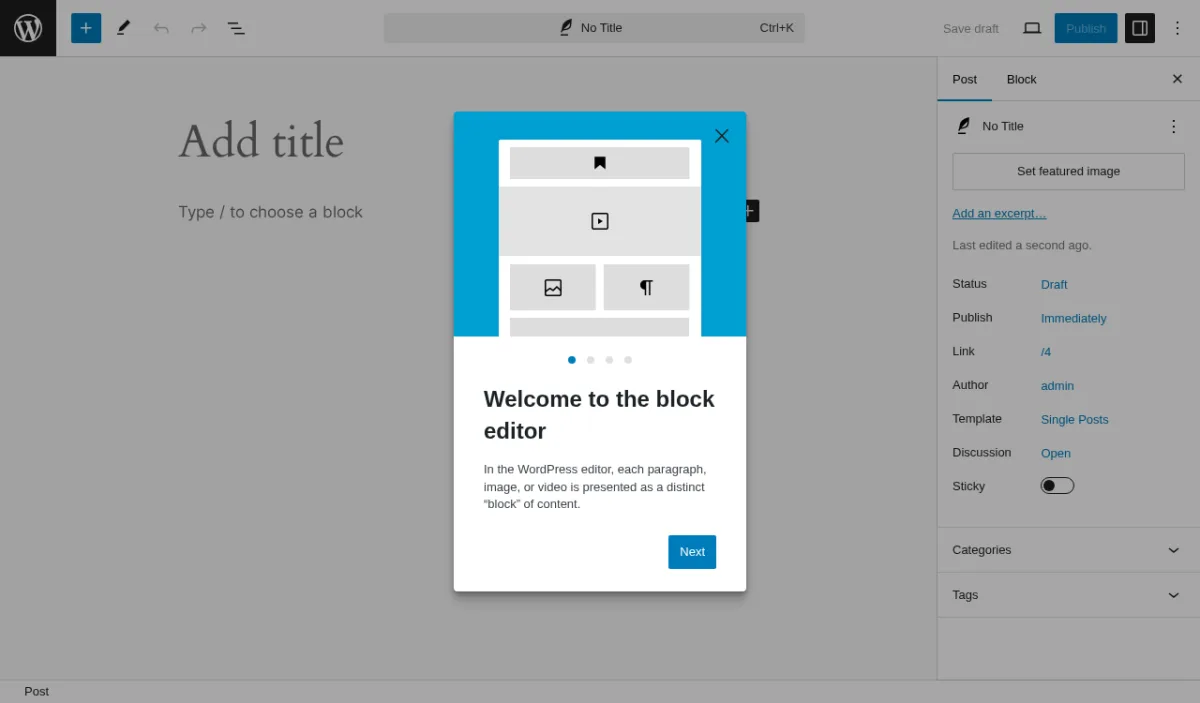
Repeat for Home, Contact, and any other foundational pages.
To create your first blog post:
- Go to Posts, Add New.
- Add a title, write your content, set a featured image and an excerpt.
- Assign a Category and (optionally) a few Tags.
- Click Publish.
The block editor is the standard WordPress writing experience in 2026. It supports cover blocks, embeds, columns, tables, accordions, FAQ blocks, lists, and reusable patterns. If you outgrow it for full-page design, install a page builder like Elementor or Spectra (more on plugins below).
Step 6: Customize your essential settings
Before you install plugins, lock down a few core WordPress settings.
Site title and tagline
Go to Settings, General.
- Site Title: usually your brand name. This appears in the browser tab, in search results, and inside many themes.
- Tagline: a short, descriptive line (8 to 12 words). Replace the default "Just another WordPress site" or remove it entirely.
Permalinks (URL structure)
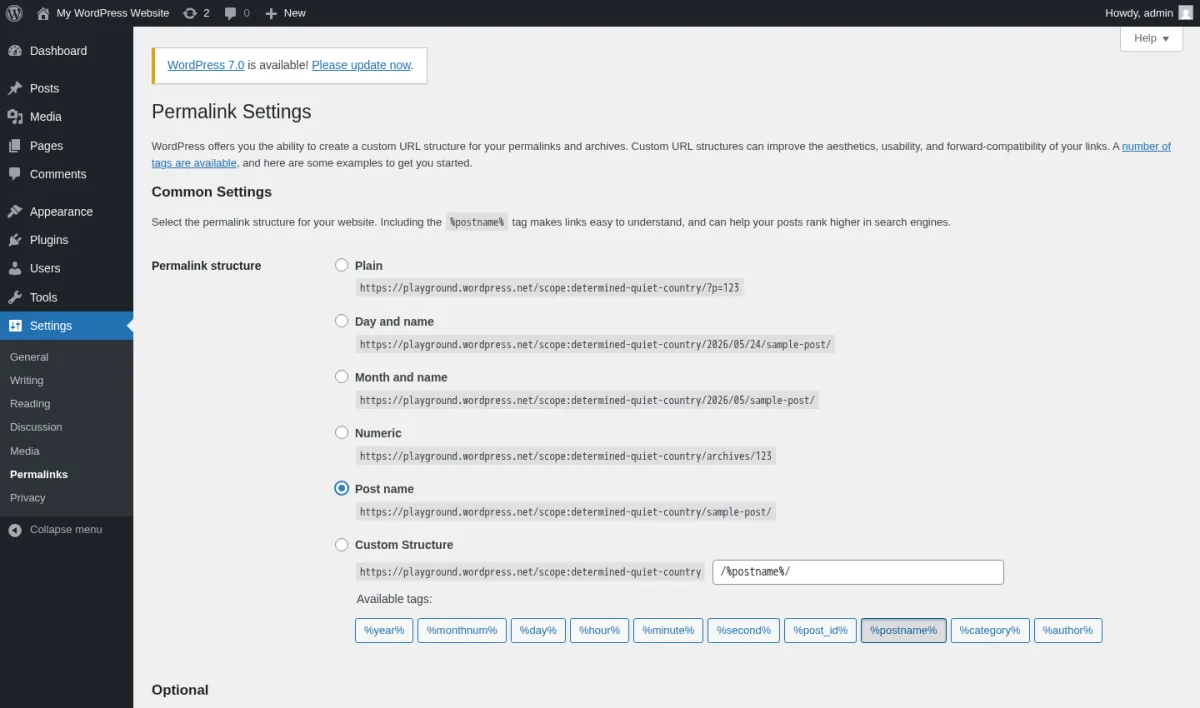
Go to Settings, Permalinks and pick Post name. This produces clean URLs like yourdomain.com/your-post-title/, which are better for SEO and easier to share. Save changes.
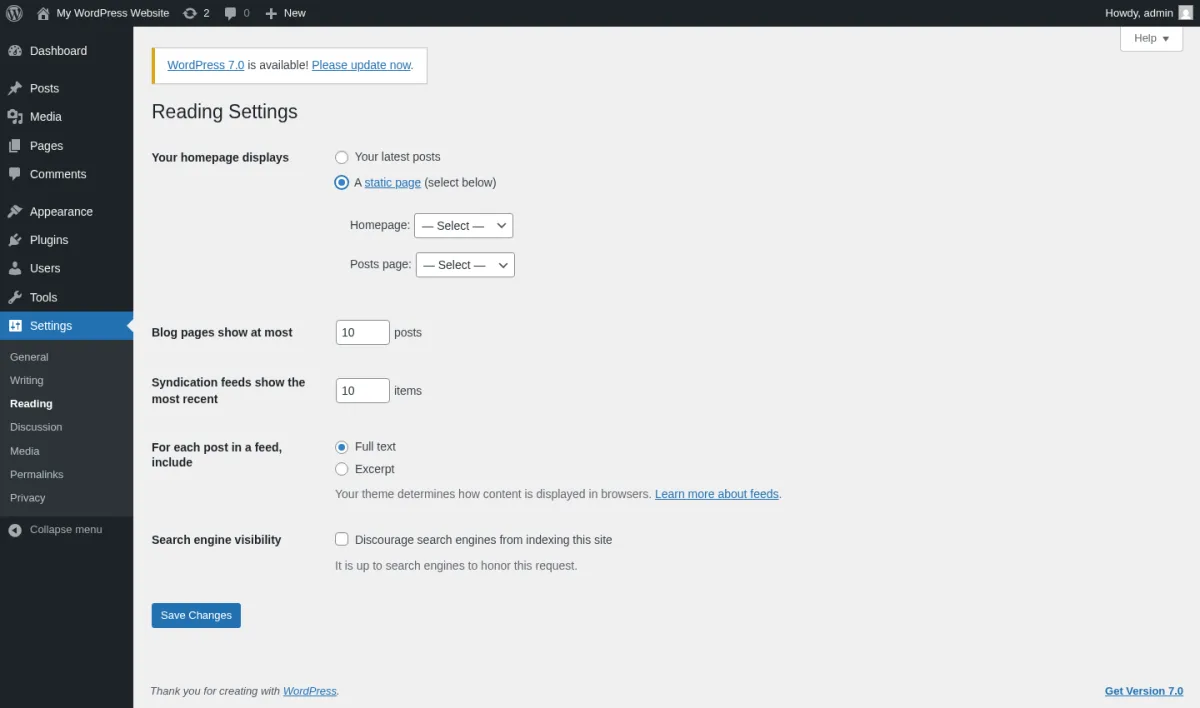
Homepage
By default, the homepage shows your latest posts. If you want a static homepage:
- Go to Settings, Reading.
- Choose A static page.
- Pick the page you want as your homepage (for example, "Home").
- Optionally pick a separate "Posts page" for your blog feed.
Discussion (comments)
Go to Settings, Discussion. Most modern blogs either:
- Allow comments but require approval for first-time commenters.
- Disable comments entirely (cleaner if you are not running a community blog).
Whatever you choose, turn on An administrator must always approve the comment to filter spam, and consider Akismet or Cleantalk later for automatic filtering.
Time zone, date, and email
Still inside Settings, General, set the correct Time zone, Date format, Site language, and Administration Email Address (this is where WordPress sends critical updates).
Menus
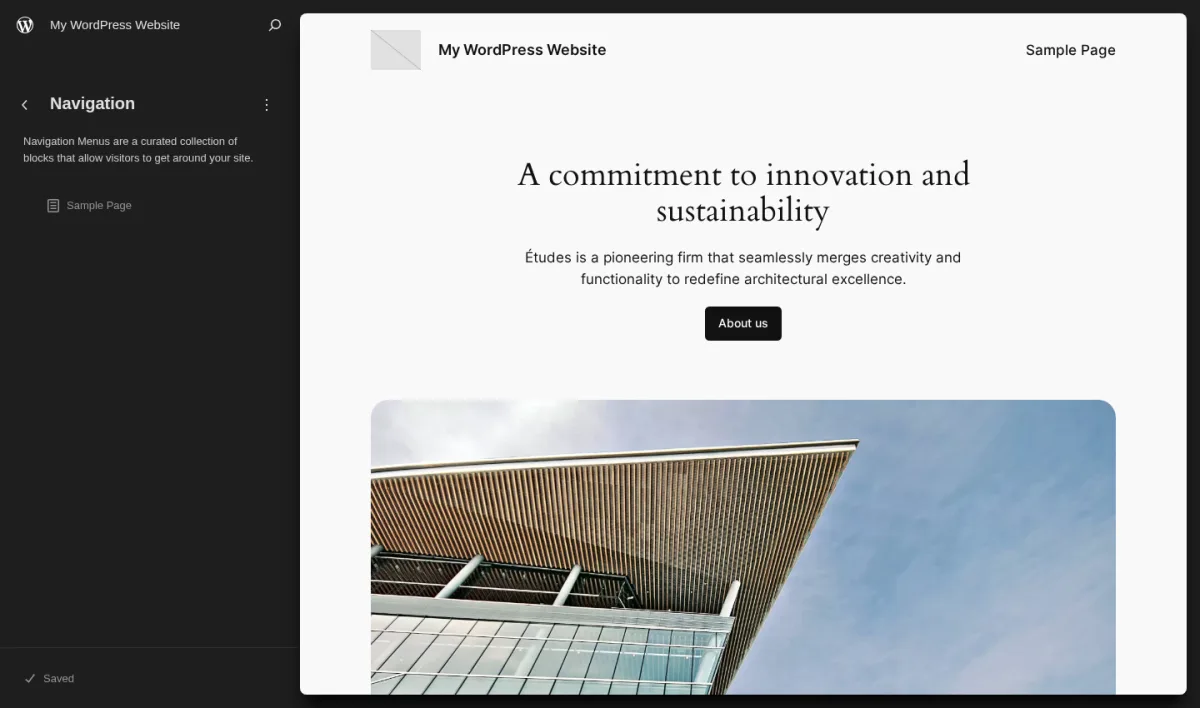
Most themes use one or two menus. To create one:
- Go to Appearance, Menus (classic themes) or open the Site Editor (block themes) and edit the header pattern.
- Add the pages you just published.
- Drag to reorder. Indent items to create a dropdown.
- Assign it to a menu location (Primary, Footer).
- Save.
Step 7: Install your starter plugins
Plugins extend WordPress. They are how you add SEO, contact forms, performance, security, eCommerce, bookings, social sharing, and analytics without touching code.
Install a plugin by going to Plugins, Add New, searching by name, clicking Install Now, then Activate. For premium plugins, upload the zip from Plugins, Add New, Upload Plugin.
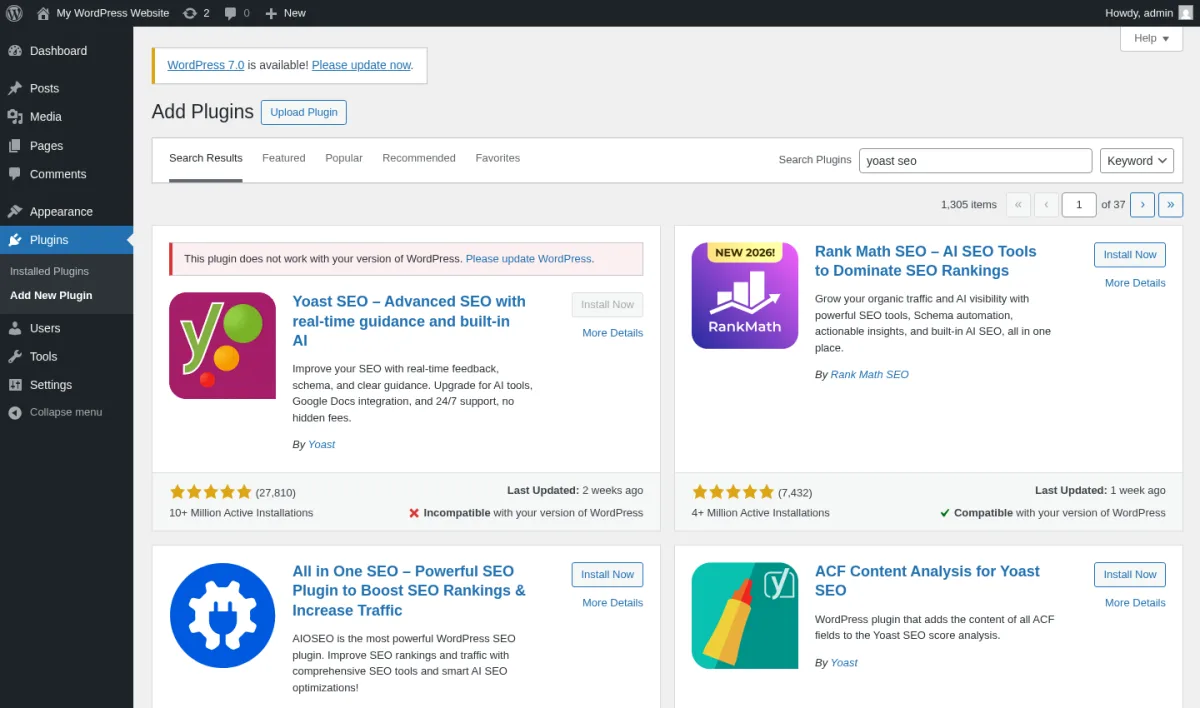
A clean starter stack for a 2026 site looks like this:
Page builder or block experience
- Elementor: the most popular drag-and-drop builder. Pairs with Hello Elementor theme. Good if you want pixel-level control without code.
- Spectra or GenerateBlocks: block-editor add-ons that add modern layout blocks while staying inside Gutenberg.
If you want a longer comparison, see 8 top WordPress page builder plugins.
SEO
Pick one (do not stack two SEO plugins):
- Yoast SEO: long-standing default, great content analysis.
- Rank Math: strong free tier, schema-heavy, fast UI.
Both are covered side by side in 3 top free SEO plugins compared.
Analytics
- Google Site Kit: official Google plugin, connects GA4, Search Console, AdSense, and PageSpeed Insights.
- MonsterInsights Lite: friendlier GA4 dashboards inside WordPress.
Performance
- WP Rocket (premium) or LiteSpeed Cache (free, if your host runs LiteSpeed): caching and asset optimization.
- A lazy load plugin if your theme does not already lazy load images out of the box. We compared the best options in the best lazy load plugins for WordPress.
- For a deeper performance walkthrough, see the WordPress speed optimization guide.
Security
- Wordfence: firewall, malware scan, and two-factor login.
- Solid Security (formerly iThemes Security): login hardening, brute-force protection.
Round-up: top 10 free security plugins for WordPress.
Backup
- UpdraftPlus: schedules backups to Google Drive, Dropbox, or S3.
- WPVivid: free alternative with a clean migration tool.
Forms
- WPForms Lite: beginner-friendly contact, feedback, and survey forms.
- Fluent Forms: strong free tier with conditional logic.
eCommerce
- WooCommerce: the standard for selling physical and digital products on WordPress.
If you plan to sell anything from day one, read our walkthrough on setting up a WooCommerce store right after you finish this guide.
Bookings and appointments
If you run a service business (clinic, salon, coach, consultant, tutor, studio), a booking plugin replaces the back-and-forth email step entirely. Booknetic is a full WordPress appointment booking plugin with calendar sync, payments, reminders, staff management, and multi-location support. Browse it at the Booknetic site.
Social media automation
Once you start publishing, share your posts everywhere automatically instead of copy-pasting:
- FS Poster: auto-posts and schedules WordPress content across 17+ networks (Facebook, X/Twitter, Instagram, LinkedIn, Pinterest, Telegram, Bluesky, Threads, Reddit, and more). You can also see how it works in our FS Poster review.
Step 8: Pre-launch checklist
Before you tell anyone about your new site, go down this short list:
- Force HTTPS. Confirm your URL is
https://, nothttps://. Most modern hosts ship a free Let's Encrypt SSL certificate. Re-save Settings, General, WordPress Address (URL) and Site Address (URL) with thehttps://prefix. - Set permalinks to "Post name" (already done above, but double-check).
- Make sure search engines can index you. Go to Settings, Reading and confirm the box "Discourage search engines from indexing this site" is unchecked.
- Connect Google Search Console and Google Analytics 4. Site Kit handles both inside WordPress in a few clicks.
- Run a backup. UpdraftPlus or WPVivid will let you confirm one full backup exists before you start customizing.
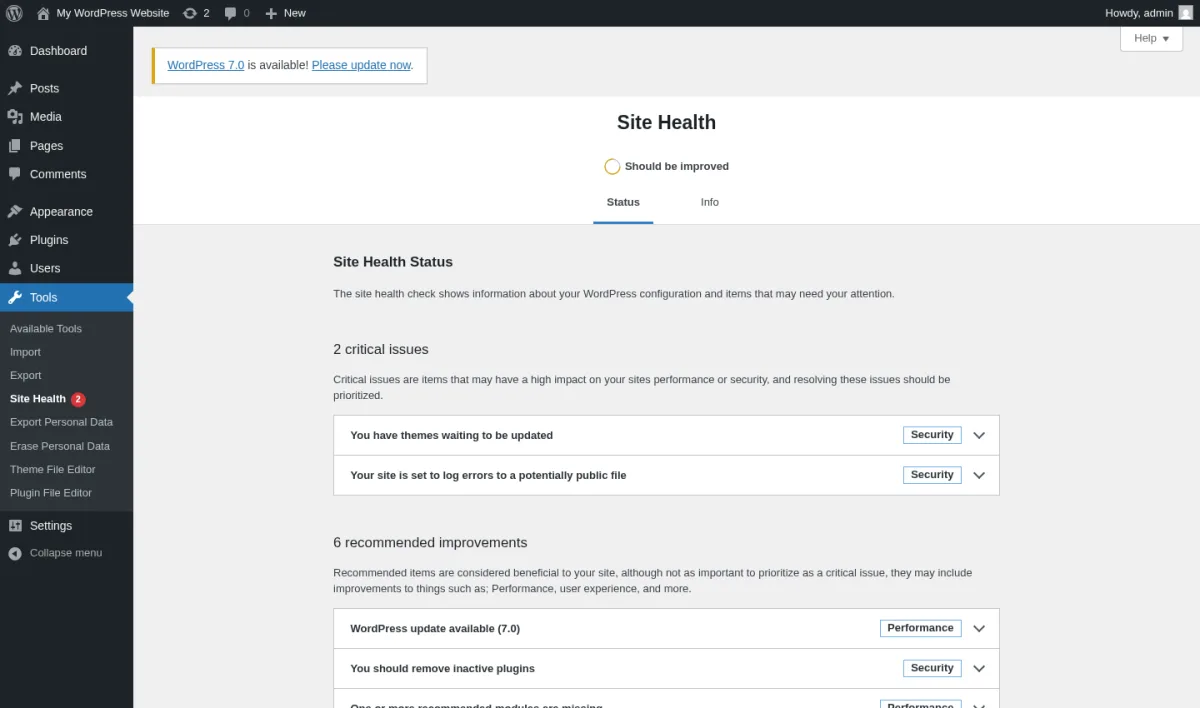
- Run Site Health. Go to Tools, Site Health and resolve any critical issues. WordPress flags weak PHP versions, missing modules, or broken cron jobs here.
- Set up Wordfence (or your security plugin) with a strong password, brute-force protection, and two-factor login.
- Add a cookie consent banner if you target the EU/UK. A free plugin like CookieYes or Complianz handles GDPR consent without a designer.
- Test on a phone. Open the site on your phone and check the menu, tap targets, image sizes, and form submission.
- Check Core Web Vitals. Run your homepage and your most important post through PageSpeed Insights. Aim for LCP under 2.5 seconds and INP under 200 ms.
Once those are green, you are ready to launch.
WordPress tips and tricks for 2026
A few practical habits that separate a site that survives from one that gets hacked, slow, or abandoned:
- Update WordPress core, themes, and plugins weekly. Enable auto-updates for trusted plugins.
- Use one image format consistently. WebP is the safe modern default. AVIF is even smaller if your host supports it.
- Compress every image before upload. A 4 MB photo from your phone should be a 150 KB WebP on your homepage.
- Limit plugins. Every plugin is code that can break or slow you down. If you can do the same job with one plugin instead of two, do.
- Pick one SEO plugin and stick with it. Yoast or Rank Math, not both.
- Write descriptive titles and meta descriptions for every page and post. Use the SEO plugin's snippet preview before publishing.
- Build clean URLs. Short, lowercase, no dates, no stop words.
yourdomain.com/wordpress-website-guidebeatsyourdomain.com/2026/05/24/how-to-build-a-wordpress-website-the-full-guide. - Keep a content calendar. Use a simple sheet, a Notion board, or a tool like Planly's social media content calendar so you know what is going out, when, and on which channel.
- Back up before every big change. Theme switch, major plugin update, PHP version bump.
- Monitor uptime. UptimeRobot, BetterStack, or Pingdom will ping your site every minute and email you if it goes down.
- Schedule maintenance. Once a month, review broken links, refresh dated content, delete unused plugins, and check Search Console for crawl errors.
- Use a CDN (Cloudflare's free tier is enough for most beginners) so visitors from anywhere in the world load your site from a nearby edge server.
- Stay legal. A privacy policy, a cookie banner, and a clear contact page are not optional anymore in most regions.
Frequently asked questions
How much does a WordPress website cost in 2026?
A realistic first-year budget for a self-hosted WordPress site is $60 to $150. That covers a domain (about $10 to $15), shared hosting (around $3 to $5 per month on an introductory plan, often with the first domain free), and a free theme. If you want a premium theme or a paid page builder, add $50 to $200 one-time.
Is WordPress.com the same as WordPress.org?
No. WordPress.org is the free open-source software you install on your own hosting and fully control. WordPress.com is a managed hosting service built on top of that software, with paid plans, fewer plugin options on lower tiers, and a different dashboard. This guide covers WordPress.org, which is what most businesses use.
Do I need to know how to code to build a WordPress website?
No. You can launch and run a full WordPress site without writing any code. Themes handle the design, plugins add features, and the block editor handles content. If you eventually want custom CSS or a child theme, you can add that later.
Which host should a beginner use?
Bluehost, Hostinger, SiteGround, and DreamHost are all reasonable shared-hosting picks for a first site. We compared them in detail in the best WordPress hosting plans guide. If budget is your only constraint, you can also test on free hosting, but expect ads and limits.
Should I use a block theme or a classic theme with Elementor?
A block theme like Twenty Twenty-Five, Kadence, or a Spectra-based theme is the most future-proof choice in 2026 because it works with Full Site Editing. If you prefer drag-and-drop visual editing and an ecosystem of widgets, Hello Elementor + Elementor Pro is still a strong path.
How long does it take to build a WordPress website?
You can have a live, working site (homepage, about, contact, blog) in 2 to 4 hours by following this guide. Adding real content, polishing the design, and configuring SEO, analytics, and security usually adds another 4 to 8 hours.
How do I keep my WordPress site secure?
Use strong passwords, enable two-factor login, keep WordPress core/themes/plugins updated, install a security plugin (Wordfence or Solid Security), schedule automatic backups (UpdraftPlus), and avoid downloading themes or plugins from untrusted "nulled" sites. The top 10 free WordPress security plugins guide is a good starting point.
What plugins do I really need on day one?
Five categories cover almost every new site: SEO (Yoast or Rank Math), security (Wordfence), backup (UpdraftPlus), forms (WPForms or Fluent Forms), and analytics (Google Site Kit). Add a page builder, eCommerce plugin, or booking plugin only if your site actually needs them.
Conclusion
You now have a complete, working WordPress website. The fastest way to keep it healthy from here is simple: publish something useful at least once a week, update your plugins, check Search Console once a month, and back up before every big change.
Two natural next reads, depending on where your site is heading:
- If you want to sell physical or digital products, follow our step-by-step WooCommerce setup guide.
- If you want to share posts across social platforms automatically as you publish, check out FS Poster and the FS Poster review.
Welcome to WordPress in 2026. Now go ship something.


